 6766
6766
Introduction
The best part of running your business is, of course, getting paid. Segpay makes it easy to set up how and when you’ll receive payouts. Specifically, you can choose:
- on which day we should pay you
- in which currency
- to which bank
To get started, login to our portal at: https://mp.segpay.com, then point your mouse at the Financial Details menu and select Payout Configuration.
Payout Configuration
Follow these steps to let us know how and when you want to be paid:
1. Select the specific merchant ID (MID) whose payouts you want to configure. Notice the search box, which comes in handy if you have a long list of merchants to scroll through.
2. Choose the currency you want to be paid in, if different than the currency of the funds in your account. SegPay can pay you in the following:
- US Dollars (USD)
- Euros (EUR)
- British Pounds (GBP)
Example: a portion of your sales are in EUR but you want those funds paid to you in USD. Select “Pay my EUR transactions in” USD; and leave “Pay my USD transactions” at the default (USD), as in the following image:
As you see in the image above, for each currency you want to be paid in, a few more options are displayed. They are:
3. Pay Me: Select when you want to receive your payouts. Your options are:
- Every Wednesday
- First Wednesday (of each month)
- Last Wednesday (of each month)
- First and Third Wednesday (of each month)
- Hold Payment: Funds are held in your account (not paid out) until/unless you change this to one of the previous three settings.

4. When Payout Amount Reaches: Funds are paid out on the day you specified in the previous step, but only if the balance in your account is at, or above, the minimum amount entered here. If your funds are below this amount when your payout day arrives, the funds are held until the next payout day.
Enter the minimum payout amount (must be at least 125).
5. To This Bank: Select the bank where you want your payouts deposited.
If you already have a bank(s) associated with your merchant ID, the bank(s) will be pre-populated here and you can select the bank where you want payouts deposited.
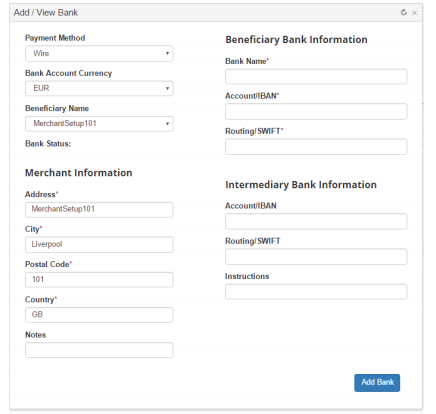
If there are no banks in this account yet, the field shown above will be grayed out (read only). Click View or Add Banks, then click Add New Bank and enter the following:
- Payment Method: Choose how you want to be paid: Wire, ACH, Paxum, Payoneer.
- Bank Account Currency: Select the local currency (USD, EUR or GBP) used at this bank.
- Beneficiary Name: Select the merchant associated with this bank.
- Bank Status: One of three statuses will display:
- Pending – the initial status until SegPay successfully communicates with the bank.
- Open – SegPay has successfully sent payment to the bank.
- Closed – SegPay’s last payment attempt failed. You will be notified if this happens.
- Merchant Information: Your contact information is pre-populated here.
- Beneficiary Bank Information: Enter the bank’s name, IBAN account number and Routing or SWIFT code; or your Payoneer member ID/Paxum email (these are all required fields).
- Intermediary Bank Information (optional): If for some reason SegPay’s bank cannot communicate with your beneficiary bank, we will ask you to provide an Intermediary bank. This is very rare.
Click Add Bank to save, and you are taken to the My Banks screen with your list of banks, including the newly-added bank added:
Click View next to any bank to see the bank’s details (see Add/View Bank screen above).
6. Select notifications. You can be notified each time a payout is deposited in your account. Go back to the main payout configuration page to set up alerts via one or both of the following:
Email: Enter your email address.
SMS: Enter your phone number to receive text messages.
7. Click Save Funds Configuration to save your payout settings.
If you ever need help with your payout configuration, or if you have thoughts or suggestions on this or any other Segpay feature, please contact us at [email protected].


